Comfortable Living
RECENT POSTS
Heacock Builders Wins Contractor of the Year Award
We are excited to announce that we won a national Contractor of the Year (CotY) award for a detac
POPULAR POSTS


Comfortable Living

Design Concept
 The retired owners of a late 1800’s three story twin home came to our company to design a new use for an existing dilapidated addition. This old addition, which had been added to the house in the 1940’s, contrasted the original beauty and traditional style of the existing house. The flat roof of this structure had been leaking for years, which had caused mold to grow in the interior rendering it unusable. The client wanted to make use of this first floor addition and fix it up to blend into the house and surrounding homes. They loved their home and also had plans to “age-in-place”. Since there were no bedrooms on the first floor, they decided to renovate it to fit their future needs. The client presented the following program requirements to our company during the design phase:
1. All spaces were to conform to “aging-in-place” with a few exceptions as requested by the owner 2. A mudroom for gardening tool storage
3. A wheelchair accessible Bathroom
4. Multi-purpose room to be used as both a sitting room and a future bedroom
After looking at the dilapidated old addition, we decided that it was in such disrepair and filled with mold that it would be best to remove the structure down to the foundation. In addition to maintaining the foundation, the party wall was also maintained, since it was part of the other half of the twin. This masonry wall also acted as the fire separation between the two homes which was required by code.
Existing Structure
 The state of existing addition was in such disrepair that it was more economical to tear most of it down than modify it. One of the major problems was that the roof was not pitched correctly and when we started construction, it had 6” of standing water sitting in the center. Because of this problem over the years, ceiling joists were rotten and beams were beginning to split. We believe that this would have collapsed within the next year or so if nothing was done. By removing most of the structure, it allowed us to have more flexibility with the new design.
Initial Problems
1. There was limited access to the rear yard which made getting a dumpster to the back yard impossible. A small gat to the driveway also restricted the size of vehicles onto the property.
2. 2 large trees had to be protected during construction.
3. A second floor bedroom was to remain as is, which limited the roof pitch and design of the new addition.
4. This garage was to be repurposed as a new garden patio.
5. The rear yard was small, which limited material storage during construction
Solutions
1. Plywood was laid down on the ground to protect it from ruts while we used a small backhoe with forks to move material from the street to the rear yard. It also allowed for the mason to get his equipment back to the site.
2. These were protected fromv ehicles and construction.
3. A low pitch roof was designed strategically to miss the window and allow for enough counter flashing.
 Interior Problems
1. The existing vinyl windows do not match the existing wood windows of the original house.
2. The ceiling joists were rotting from years of water damage
3. A main beam had a large split in it and was begining to fail
Solution
The decision was made to remove the main structure down to foundation, while also preserving and repairing the masonary party wall
1. The foundation wall was lowered to support the 2’-0” cantilevered floor overhang
2. Existing concrete slab was covered with a 15 mil vapor and radon barrier. A layer of 2” rigid insulation was also added on top to prevent moisture and heat loss through the floor.
3. The existing masonry party wall was repaired and extended to match the exact pitch of the roof. Stucco was applied to the neighbor’s side to blend the old and new masonry together.
4. The roof pitch was maximized, but still maintained a clearance for counterflashing flashing to be installed under the window. The rafter shown was set to verify all the heights.
Obstacles
1. Because the existing structure was a slab on grade, the HVAC duct was designed to be incorporated into the framing to minimize cost due to the budget. The floor was framed to accommodate the ductwork, and supported to the slab below.
2. Framing lumber was strategically placed to fit into the small rear yard
3. An existing Bilco door stairwell was utilized to gain access for the HVAC from the main house basement to the duct channels in the new structure
4. The existing masonry party wall followed the property line and was not square to the existing house or the remainder of the addition. Therefore the roof rafters and main hip beam were cut to accommodate this. On the interior, a 1 1⁄2” metal stud interior wall was framed to square up each room
Framing Obstacles
1. Extended floor overhang. Pressure treated plywood was installed on the underside with 3 layers of rigid insulation to seal the underside from animals and heat loss.
2. Framingwasaddedtoincorporate crown and soffit returns. (see final exterior photos for crown details)
3. The hip beam consisted of a 3 1⁄2” x 14” LVL. This had to be pocketed into the masonry party wall and the end cut to accommodate and support the fascia and crown molding around the roof perimeter.
4. Rafter tails were cut to support
Framing Solutions
1. Ceiling joist were designed to be clear span. They were anchored to the masonry party wall with a pressure treated rim board. This allowed the entire room to be open without any center supports.
2. The ceiling framing had to switch direction to accommodate the LVL hip beam
3. The LVL hip beam had to be cut as directed by the engineer to accommodate the ceiling height and soffit elevation
4. An LVL beam was installed to support rafters above and ceiling framing the soffit, fascia and crown molding.
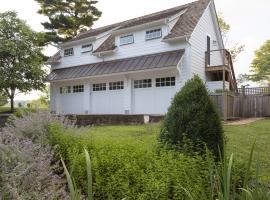
Before:
The existing structure’s style and shape did not match the existing house in style or materials. It was also in disrepair and condemnable due to mold. And because of the length of the structure, the client lost a lot of their rear yard.
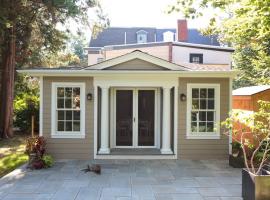
After:
 The new program was able to fit within a smaller footprint than the original structure. This allowed us to convert the rear garage section into a flagstone patio and ultimately give the client a larger rear yard. Along the rear wall, two large windows and a glass French door were added to allow views to the new flagstone patio. The new exterior walls incorporate lap siding to tie in with the original siding of the house. A color was selected by the owner with the intent of repainting the existing house to match the addition, which is to be done at a later date. Crown molding was also installed onto the fascia and gable returns in order to tie into the existing house, as well as the time period. A set of large casement windows were added to the side bump out to allow furniture and couches to be placed below. By doing this it allows the client to not lose valuable wall space, while also maximizing natural light into the room. The roof return gables were designed to enhance the overall look and minimize the low pitch roof. In return, it enhances the overall beauty of the addition within the design constraints. A recess porch with colonial columns was added to the rear entrance to provide cover from the rain when entering through the french doors. This also allowed for two exquisite reading nooks with built-in sitting benches adjacent to each side of the French doors. One step down from doors, brings the owner to an elegant rear flagstone patio, which was built on the foundation of the old garage. The clients enjoy relaxing on their new patio and taking advantage of the beautiful outdoors.
Before:
The interior was in disrepair and filled with mold. Water had been leaking into the addition for years and caused damage that would have been more expensive to repair than to replace it. The existing wall and ceiling finishes had already begun to deteriorate and separate from the framing. The existing floor was also one step down from the main floor of the house.
After:
A large bedroom incorporates ample room to serve as both a recreational area and a future first floor bedroom. It accommodates a level access to the first floor as requested by the client. The hallway to the main house is 42” wide to allow for a wheelchair to maneuver into each space. All the doors are 36” wide to also allow a wheelchair to easily pass through. Natural light is maximized to enhance the feel and comfort of the room.
The new future bedroom focuses on glass French doors adjoining two elegantly designed window nooks. Custom built benches create a comfortable seat and the windows providing plenty of light to brighten the new room. Recessed lights are added above each window nook to provide task lighting a night. The custom benches make use of doors below for additional storage. The baseboard of the room extends onto the face of the cabinet to create a seamless look and tie everything together.
 Ceilings were maximized as much as possible to maintain the minimum pitch required for the roof above..
A custom built-in cabinet was indstalled to maximize storage. Track lights were added above to showcase the cabinet and provide additional task lighting. The cabinet was designed to tie seamlessly into the wall with the baseboard extending onto the cabinet. The angled end was designed to relieve an abrupt change in direction and ease the transition to the wall.
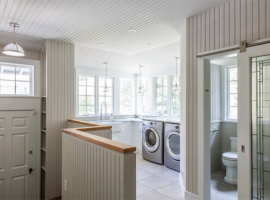
The walk-in-closet organization was selected by the client to fit their specific needs. The mudroom has plenty of maneuvering space and provides an extra deep closet to maximize the storage for outside tools and equipment. Window and door trim was selected to match that of the existing house as much as possible without custom milling trim.
The master bathroom was designed to be ADA accessible with a 36” pocket door to minimize obstructions, while maximizing maneuverability. Inside the bathroom, the owner requested a raised shower curb over the curbless option because of their personal preference. They also requested a solid cherry wood countertop that would incorporate an under mount sink. To maintain longevity and durability, exterior wood glue and wood biscuits were used along with screws installed from the underside. This was to ensure that the joints would not open over time due to prolonged water use. Also, a special sealer was used specifically for wood countertops to resist water and alcohol-based cleaners. The final look stands apart as a work of art.
Conclusion
 The original dilapidated structure was transformed into a beautiful work of art, which provided exactly what the owners needed. The new design efficiently makes use of the existing footprint, while also revitalizing the original rear garage into a terrific new flagstone patio. The new interior is comprised of a large master bedroom, which connects the existing house to the rear flagstone patio. Two perfectly placed reading nooks are situated along the rear wall of the room and provide a full view of the rear yard. Adjacent to the bedroom is a large walk-in-closet followed by a spacious wheelchair accessible bathroom. The new bathroom also includes a large shower comprised of a river stone tile floors, which provide a comfortable feel when standing in the shower. The vanity is finished with a solid cherry wood countertop, adding to the traditional feel of the home and finishes the looks of the room. The tranquil setting of the rear yard compliments the new addition and will provide for many years of enjoyment by the owner.